Co-Authored by Kat Molostvova
The Problem
A common problem in almost any codebase is having too much boilerplate code doing the same thing in too many places. This can be reduced by trying to extract logic to a common SDK framework, but when developing for a cross-platform application, we are still left with a lot of the same code for each platform’s respective views. It can be difficult to write code in 2 different places that targets different platforms, but needs to do the same thing. Duplicating code can also cause inconsistencies. On top of this, bugs will exist in two places and need to be fixed twice. All of these things can waste valuable time that could be spent doing something much more productive.
C# attributes
Fortunately for us, C# has attributes, which can be very useful. Attributes add metadata to your code where you choose to use them, and this metadata can be accessed using reflection. Attributes can be applied to modules, classes, properties, and even entire assemblies. When you create a custom attribute, you can choose what type of elements it can be applied to. Attributes can also accept as many arguments as you need, and can help you do multiple things in just one line of code.
Utilizing custom attributes along with some dependency injection has proven to be a great way to not only reduce boilerplate UI code, but also a great way to further align our application styling between platforms by setting all of our styling properties in a core module that is used by both platforms. Since each view should have the same elements(TextView/Label, Button, etc.), we can just put the same attribute on each respective element and let our core module handle the rest. It is a quick, easy, and clean way to get rid of line after line of UI setup code in our classes.
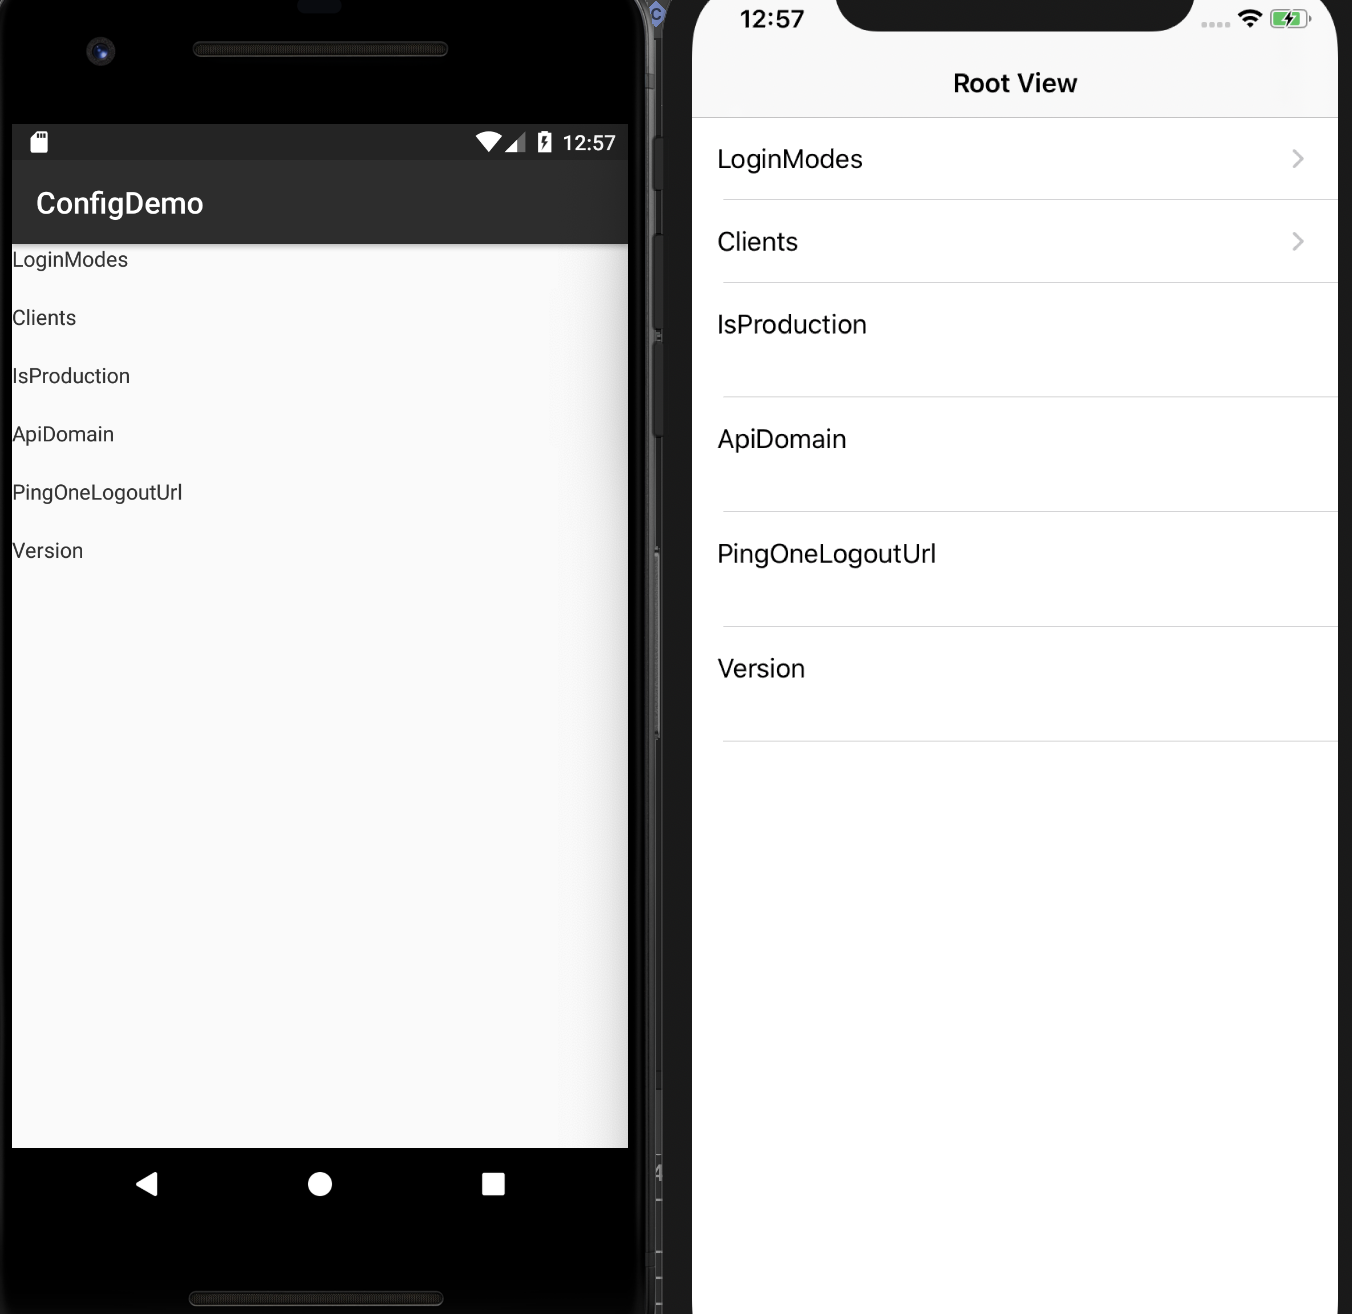
An Example
How to make an attribute
I am working on a Xamarin.Native shared multi-platform solution, but this should be applicable, with some modifications, to any C# project. Today we are making an attribute to change the size of the font on both platforms. I will be working with UILabels and TextViews.
Since attributes will be shared between multiple platforms, let’s create an Attributes folder in the shared library project, the Core.
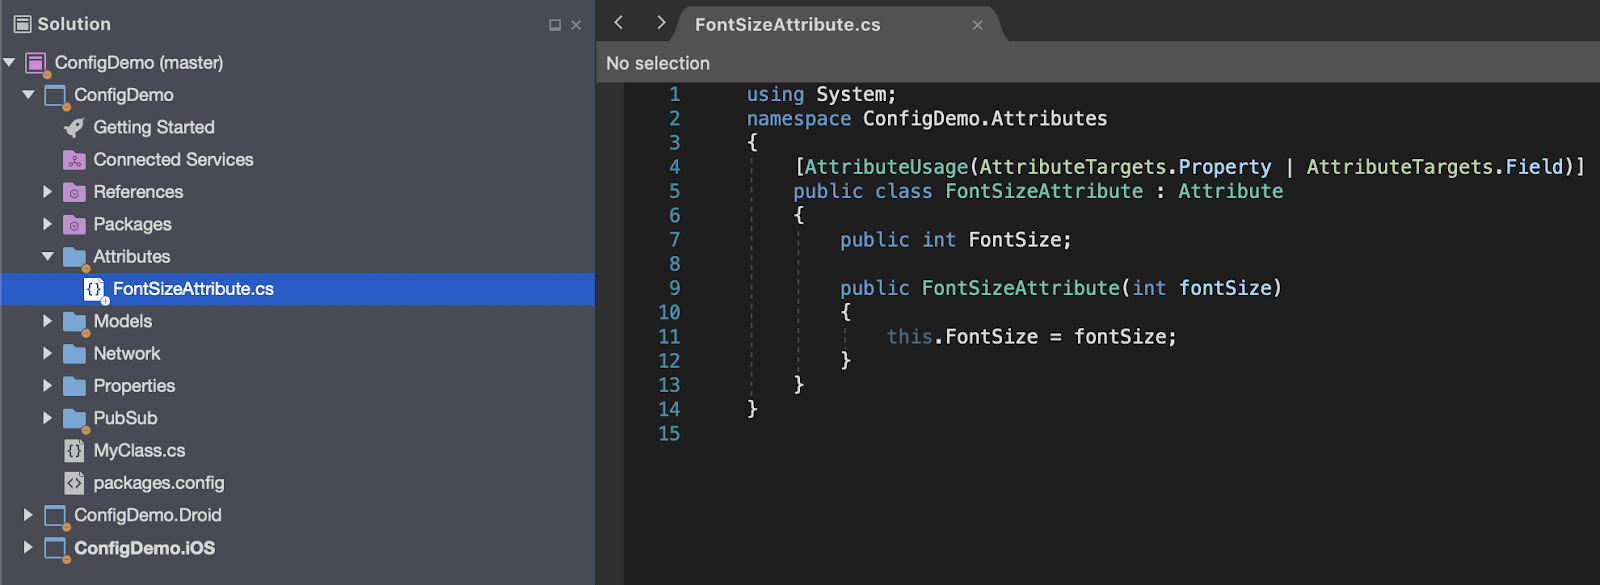
Inside, create an empty class and name it FontSizeAttribute.cs.
Next, extend the Attribute class and add an AttributeUsage attribute, which gives you control over the Attribute and what elements it applies to.
Since I want to just change the size of the font of labels, I don’t need to apply my attribute to methods or events, just properties and fields. Not using an AttributeUsage attribute won’t break your build, but it might cause performance issues later on.
Next, we need to implement the FontSize attribute itself.
Here I’m asking myself “What information is the attribute trying to relay?” In our case, that information is whatever we want the size of a property/field to be.
So, let’s declare an integer to hold the size, and inside the constructor let’s assign the value that comes from the attribute to the int.
We’ve just created an attribute! We can now apply it to any field or property on the platform side, in the respective ViewController/Activity.
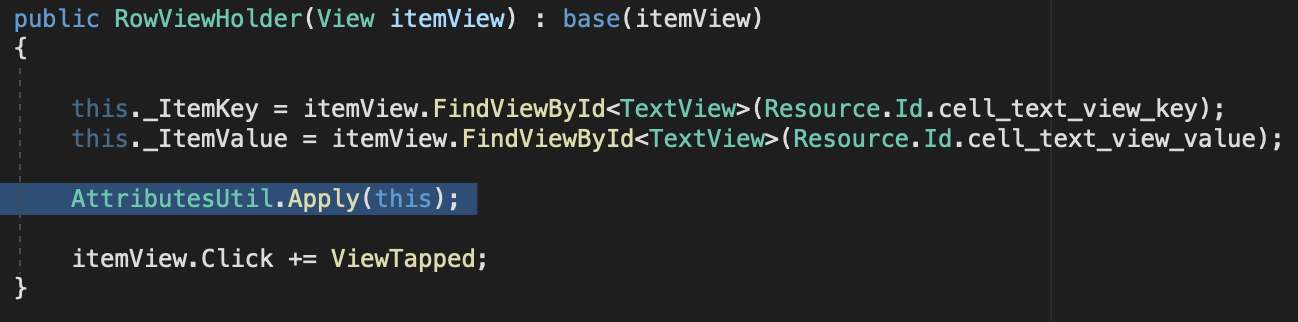
I am going to apply it to a TextView ItemKey and a UILabel KeyLabel responsible for the title of the rows on each platform. (FontSizeAttribute and FontSize can be used interchangeably)
If you try to apply it to anything else, you’ll notice an error, due to the AttributeUsage restriction from earlier. (make sure to have {get; private set; } which turns ItemKey into a property from a simple field. More on this after the example.)

There is an extra step involved in applying attributes to iOS UI elements. Since Xamarin puts the outlets in the autogenerated .design file, we need to reference that element from a user-created class. Pre-existing KeyLabels can stay as they are.

Static apply utility
We have now applied the attributes to our elements of choice. However, if you run the app, you won’t notice any changes. This is because attributes only describe elements, they don’t actually DO anything. We’ve simply placed a “tag” on a text label. Next we need to find elements with our tag and then tell the program what to do with those.
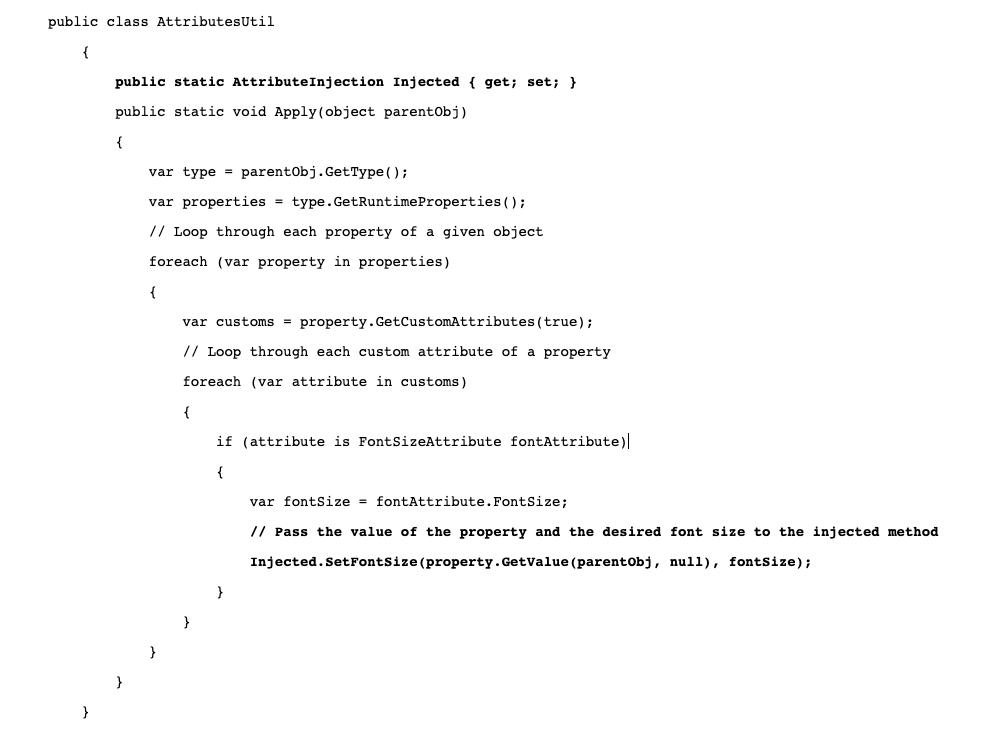
This is where AttributesUtil.cs come into play. This class will be the most important chunk of the work, this is where we will look at all properties using reflection and decide what to do with ones that have a FontSize attribute.
Since we are using reflection, which can be very costly, it’s important to go through all the properties at once and not re-enter the reflection loop several times.
Create a method that will accept an object whose properties we want to evaluate. (In my case, it would be the view that contains my labels) Since the object comes-in generic, let’s figure out what type it is so we can grab its properties.
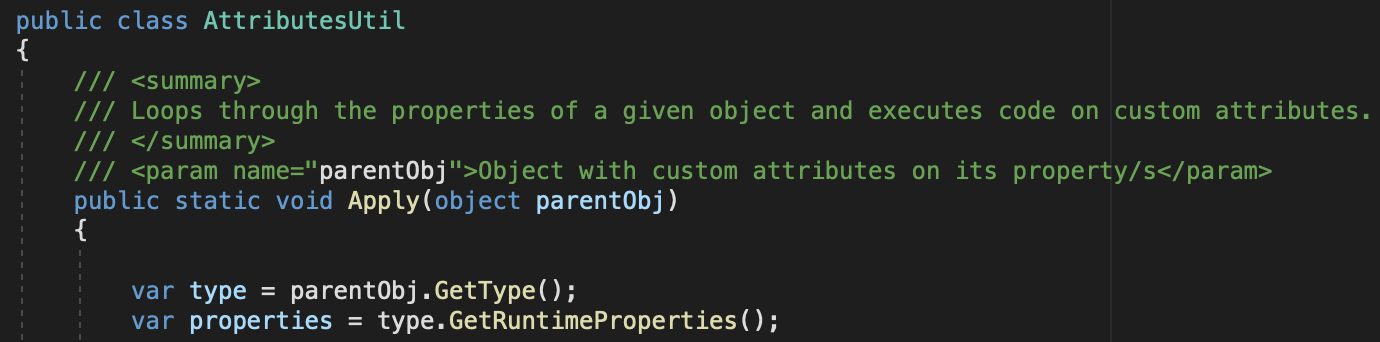
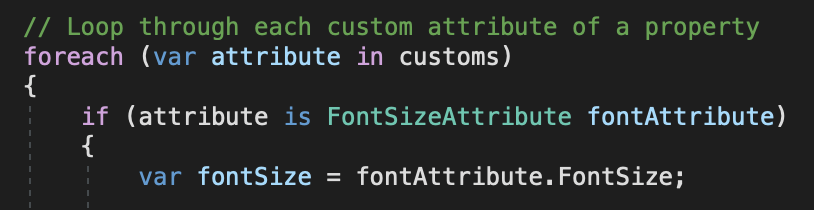
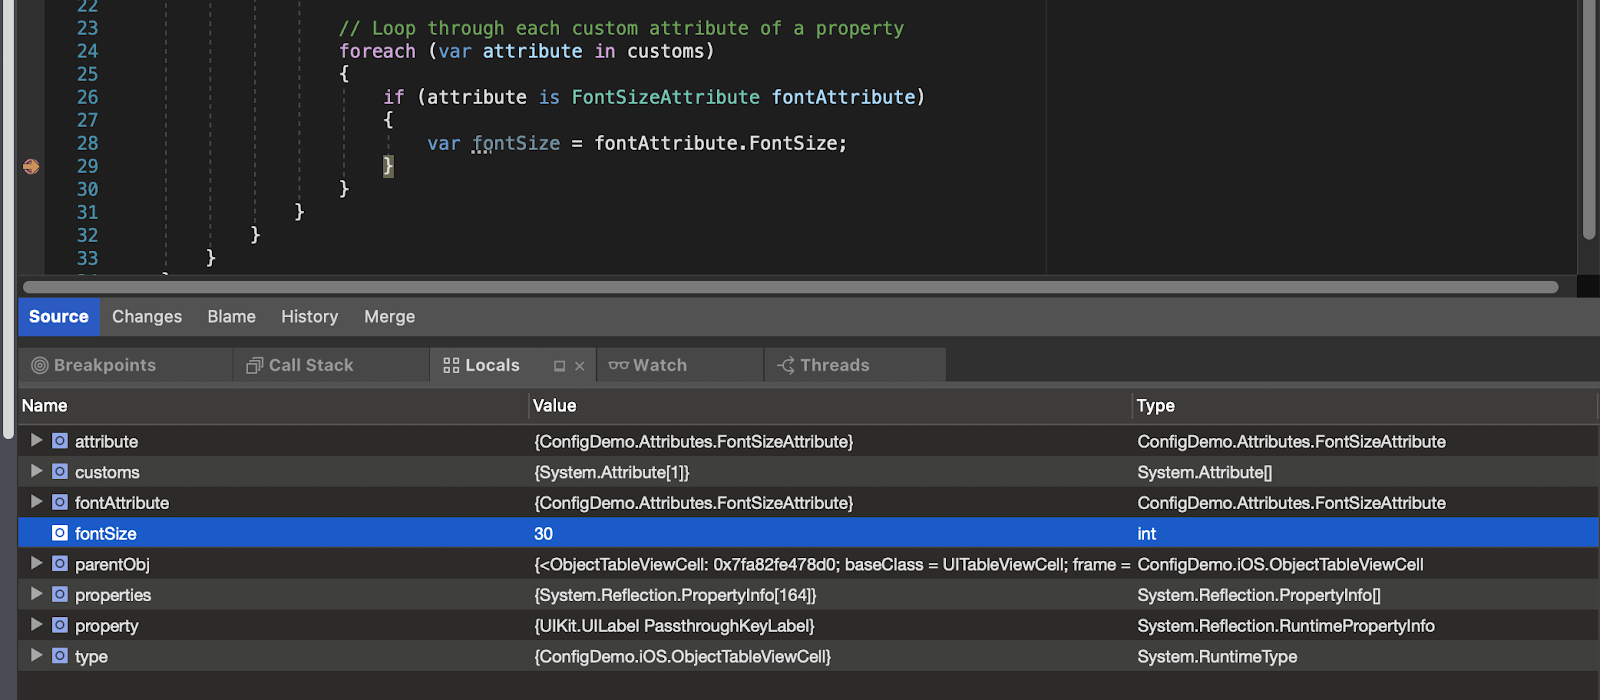
We now have a collection of all properties of a given object and can loop through it. The next step is to see each attribute of each property to find the one we care about, FontSizeAttribute. To avoid looking at every single attribute, let’s focus on custom attributes added by the programmer.

Now we can check every custom attribute to see if it’s the one we need. If it is, then grab the fontSize that was passed to the attribute.
Next, we need to call the method we just made. To do so, find where you are creating your text view/label and put an AttributesUtil.Apply(this); right after. this represents the parent view that contains the elements we want to change. Make sure you do this on both platforms.
Put a breakpoint at the end of the if statement in the Apply() method and run the app. You should see that the fontSize is set to what we passed to the attribute from the ViewController/Activity.
Dependency Injection
Now we have the information that our attribute was passing over. But what to do with it? We know the desired font size, but we can’t set the font quite yet. Not only does the PropertyInfo property not have a method SetFontSize(), setting the font size works differently on Android(.SetTextSize() ) from iOS (.Font = UIFont.SystemFontOfSize()). So, we have a dilemma. We need to call SetFontSize() on a specific UI element on a specific platform, but the value we need exists in the Core. Sure, we could do something like:
if (platform == Android) then { SomeAndroidHandler.SetFontSize(30); }
else if (platform == iOS) then { SomeiOSHandler.SetFontSize(30); }
But per SOLID design principles, the Core should be extendable to any platform. You shouldn’t need to rewrite your AttributesUtil.cs if you add support for MacOS or remove support for one of the platforms. In order to change the font size from Core while being platform-agnostic, we will use Dependency Injection.
Dependency injection supports SOLID principles by decoupling the creation of the usage of an object. That enables you to replace dependencies without changing the class that uses them. It also reduces the risk that you have to change a class just because one of its dependencies changed.
Instead of writing SomeAndroidHandler.SetFontSize() and SomeiOSHanlder.SetFontSize(), we will be able to do AttributeInjection.SetFontSize() from Core, and later on, each platform will take care of setting the font on their respective side. (In a respective HandlerClass)
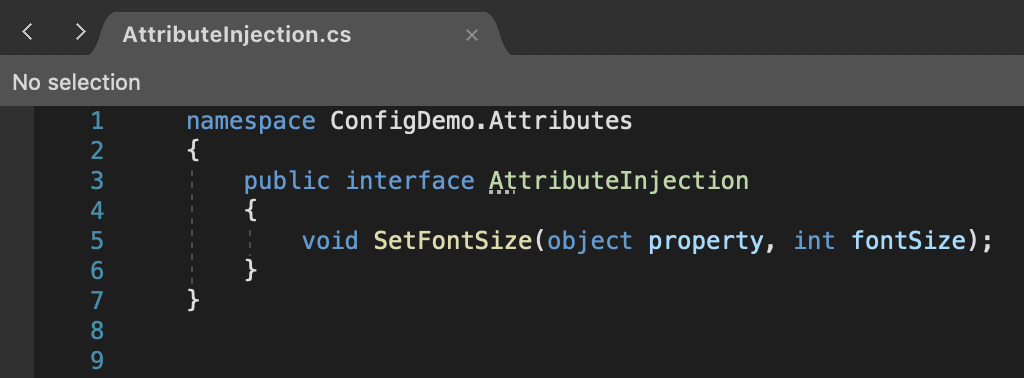
In Core, create an Interface and include the methods that both platforms will need to implement. (note: eventually, you might want to create an attribute that only makes sense for one platform, like FindViewByID. In this case, create a [Platform]AttributeInjection that extends the base AttributeInjection and adds platform-specific methods)
This interface will be used by the AttributesUtil.cs class and will be implemented by a handler class of each platform. Make sure to accept the property that is getting its font size changed, along with the int.
Now, create an instance of an injector and use its method to finish the work we need to do in Core. Here is the Apply() method so far, new lines are in bold.
We’re almost done. All that is left to do is to “translate” the injected method into something that a platform understands, and link Core’s injector to the Handler class of each platform.
Starting with the Android platform, create an Attributes folder in the [YourSolutionName].Droid solution, and inside, make an AttributeHandler.cs class. Make sure the AttributeHandler extends the AttributeInjection and implement the interface.
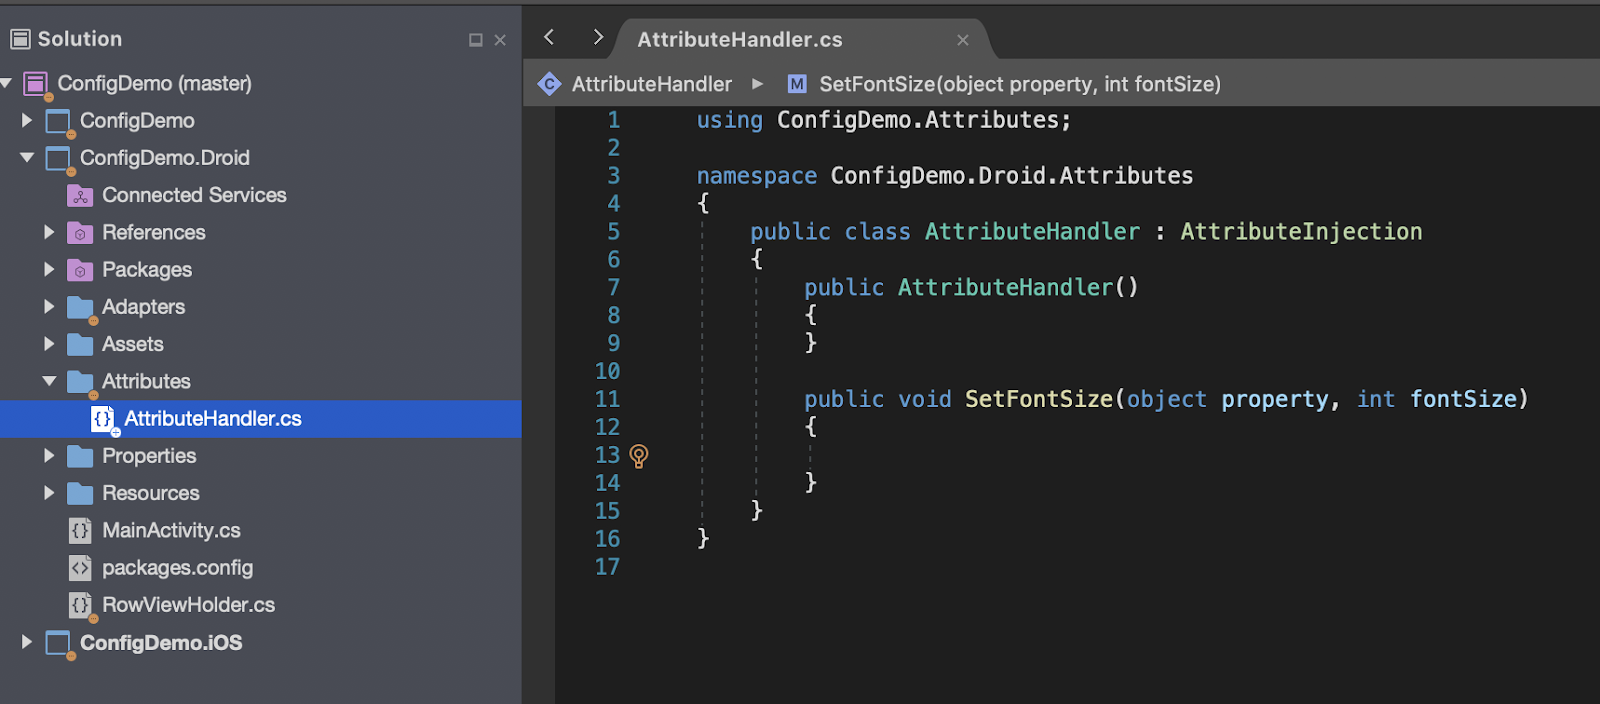
We are receiving the property as a generic object, so convert it to the same type as what you’re trying to change(and can call SetTextSize() on). For me, it’s a TextView on the Android side. Once you have the correct type, now is the time to perform the desired operation on it. The SetFontSize() function needs a unit along with the size, I’ll use ComplexUnitType.Pt for point.
Now, link the Core’s injector to the Handler class by putting AttributesUtil.Injected = new AttributeHandler(); somewhere before calling Apply();

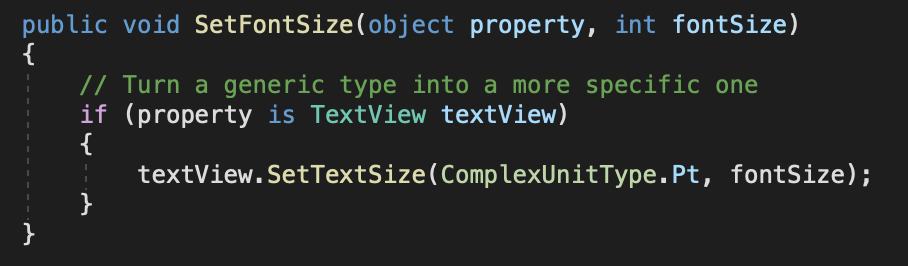
That’s it for the Android side. iOS is very similar, the only difference is what element we’re operating on (UILabel) and how to perform the desired action on said element.
Don’t forget to link the injector on this platform also.

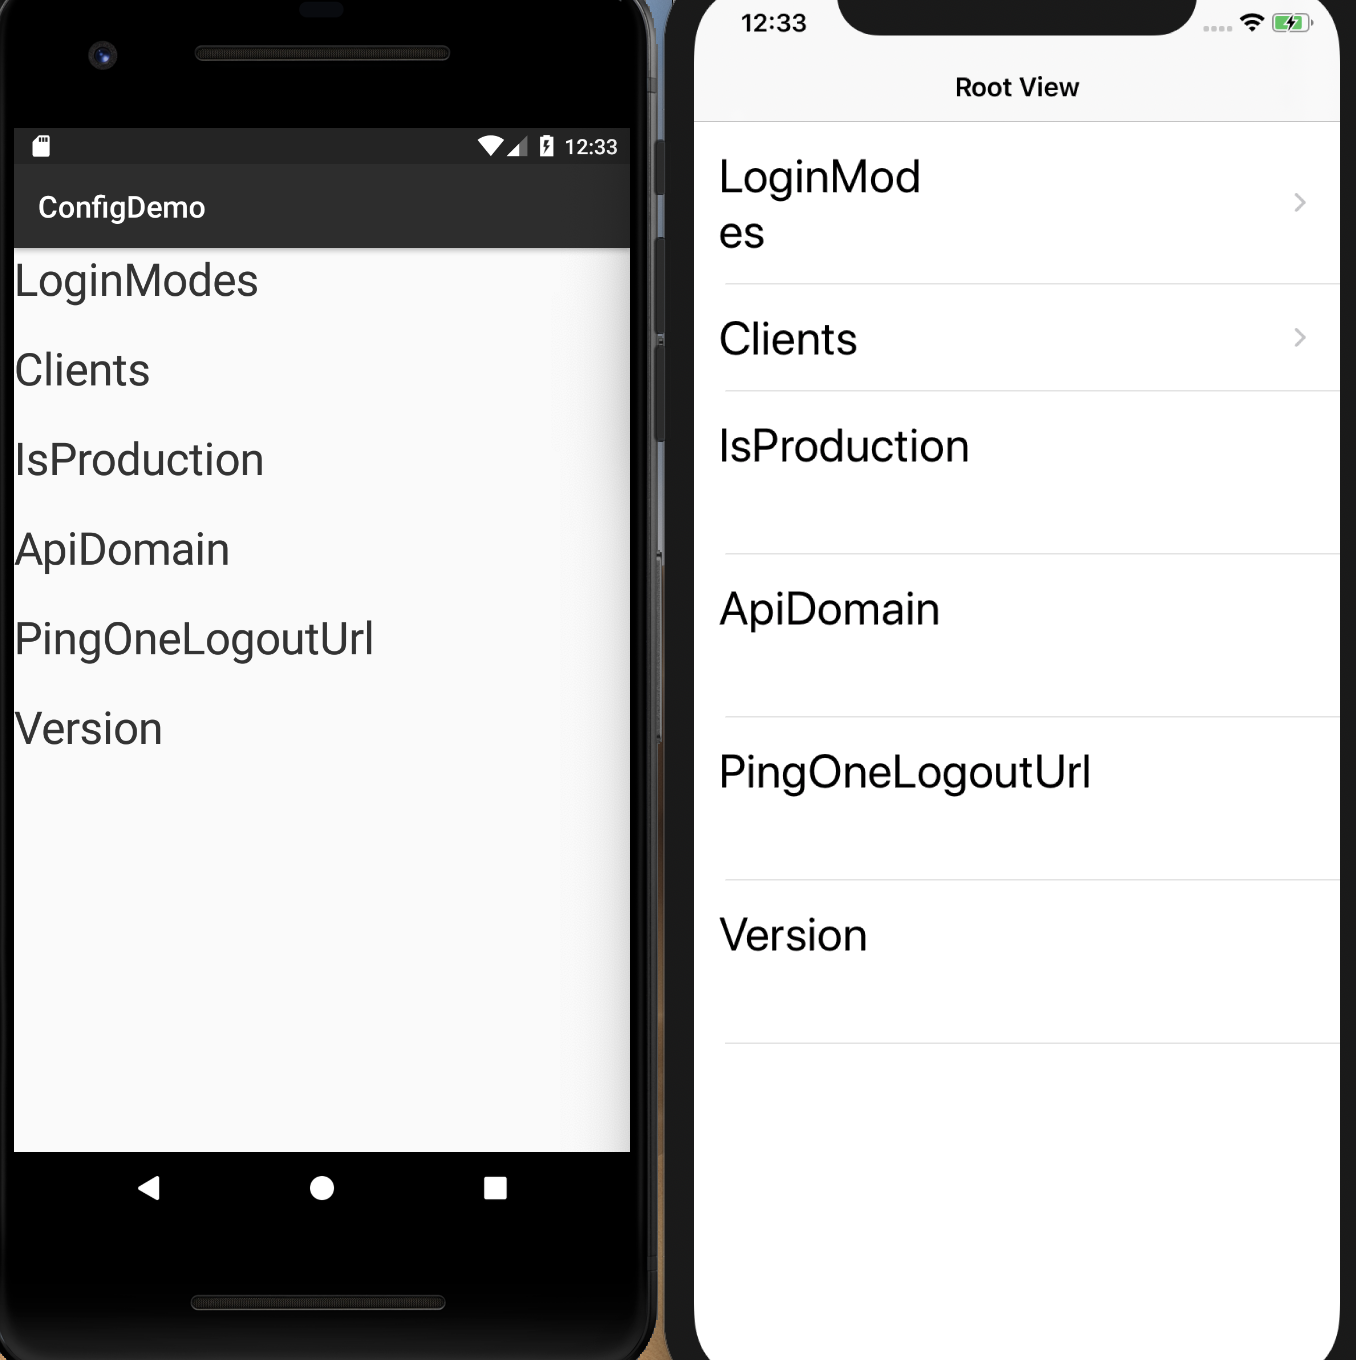
Let’s run each platform one more time.
A few more notes
The font size was successfully changed on both Android and iOS! However, it’s pretty obvious this page could use a little more than just change of font size… So how do you go about adding an attribute for font color or font family?
When adding more attributes, the creation of new classes should be minimal. You will need another class that extends Attribute and if you’re making platform-specific attributes, you will need an interface per platform. Everything else should be modifiable.
- Add additional methods to the AttributeInjection class.
SetFontColor(),SetFontType(), etc. - Implement the added methods in each of the Handler classes.
- Make sure connecting the injection to the Handler happens before
.Apply(this). A suggested way to do this is to create a base view class that callsAttributesUtil.Apply(this)in itsOnCreate/ViewDidLoadmethod and have each view that needs to use custom attributes extend that class. Place the injection linking line in a file that gets executed every time you run the app, for me it was anAppDelegateon each platform. - In the
AttributesUtil Apply()method, add another if statement per attribute to the custom properties loop

Lastly, remember how we had to put property accessors ( {get ; set ;} ) on the Android label? That was a development-time cheat, let’s look at why we did it and how to do it properly.
C# differentiates between fields and properties. In short, fields are simple class variables and properties are those variables that also have property accessors on them.
Currently, the second line of our Apply() method is var properties = type.GetRuntimeProperties();
This worked on Android because we changed the TextView ItemKey field to a property with { get; set; }. On iOS, the outlets you use are auto-generated as properties in the .design file. So when we referenced the outlet element in the user-created class, it stayed as a property. However, you shouldn’t need to change every single field into a property for custom Attributes to work. Let’s add the ability to work with fields to our AttributesUtill.cs class.
Let’s find custom attributes both for fields and properties first and then pass them to the customs loop for evaluation. We will need three new methods. Two of them are two almost-duplicates of the first part of current Apply(). Those two will both return a list of custom attributes that the third method(/latter part of Apply()) will evaluate.
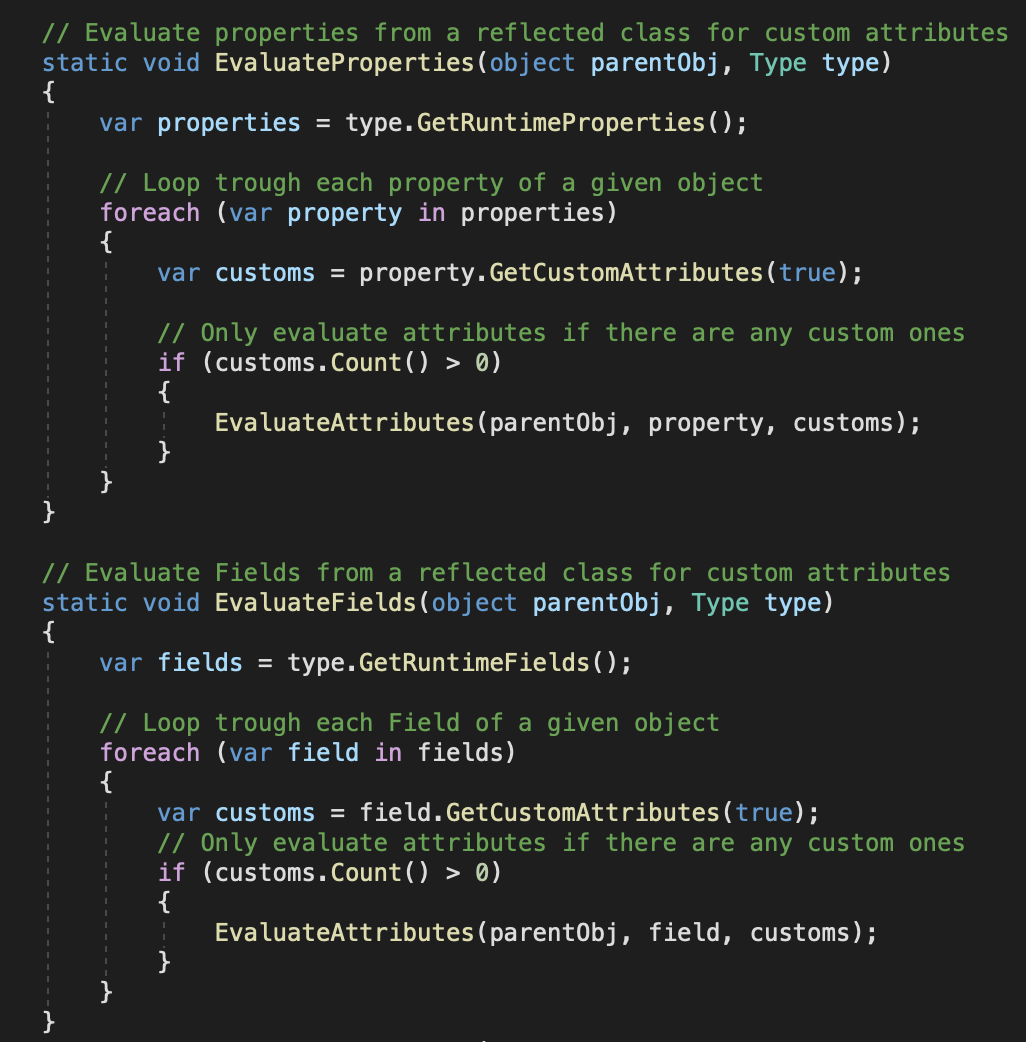
The first chunk of Apply() is split into two methods for properties and for fields.
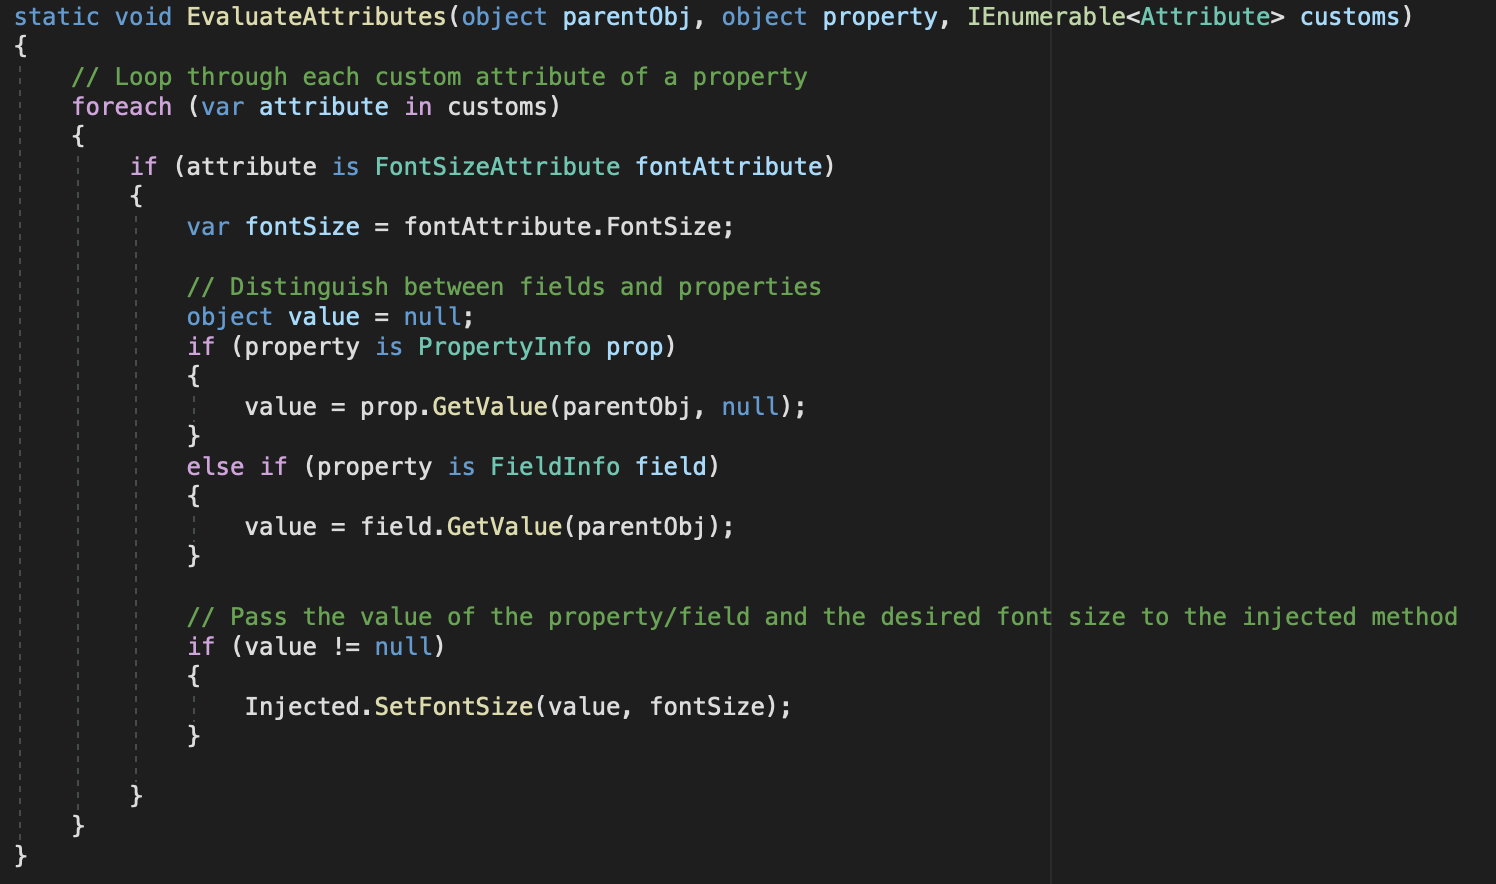
Here is the bottom portion of what used to be Apply(). Since both fields and properties will enter this method, we have to also distinguish between properties and fields to get the value of said property or field.
Finally, remove the property accessors from the Android label and make sure the attribute still works as expected.

Conclusion
As you can see, now we have made some big improvements that will help us in multiple ways. By using attributes, we have cleaned up our platform views and gotten rid of a lot of redundant boiler-plate code. This makes things more readable, and also helps align our respective iOS and Android views, which will help reduce bugs and keep things consistent between platforms. Also, now we are able to set the font size of UI elements from core. The major advantage to this is that by doing this in one place, we keep our views more consistent between platforms since they both use the attribute to set font size. This gives our app a more consistent feel regardless of what type of device you have. Even more importantly, if we need to add more changes later on, we can change things in this one class, and know it will have the same result in both platforms.
There are many possibilities of things you can use attributes for outside of this example. You can apply them to many different elements, and do much more than just this. Instead of just font size, you could create an attribute that takes 3 arguments and set all the font properties at once(Size, Color, FontType). You can set other properties through attributes in the same way such as the Accessibility Id for an iOS UI element. For Android, you can bind UI elements using attributes instead of FindViewById(). You can pass in strings to be set as label text also. The possibilities are endless! Hopefully this introduction to attributes can help you write more efficient and clean software applications in the future, and will help you come up with some ideas of your own!